|
|
Once a project is populated with Tracks, it is possible to author playback flow and user navigation. This involves executing the decisions made in the project plan about the order of content playback, the links from menus to content, and the DVD player’s response to user input via the remote control.
This sections includes the following topics:
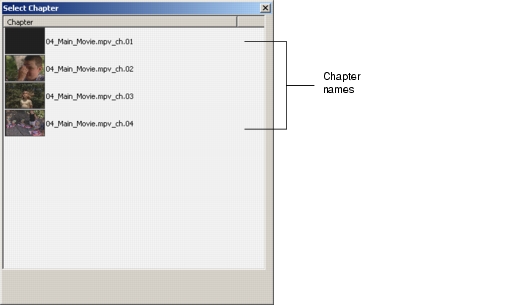
ReelDVD supports DVD-Video’s ability to navigate directly to individual chapters in a video track. Chapters are accessible through links, and viewers can also navigate chapter-by-chapter using the Skip Forward and Skip Backward keys on the DVD player remote control.
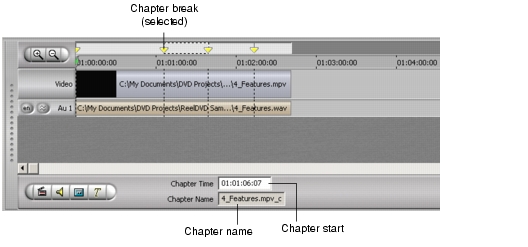
Chapters are created with the New Chapter button on the Track window tool bar (lower left). The new chapter starts at the start of the nearest MPEG Group of Pictures (GOP) to the current location of the green timeline indicator (GOPs generally occur once every half second throughout the video, and usually begin with an MPEG I-frame). A new chapter marker (yellow triangle) will appear in the display area at this location, and a vertical dashed line will appear across the streams in the Track window to show the chapter break.
Chapter markers can be moved by dragging them on the timeline. If it is difficult to position the marker precisely, try zooming in with the Zoom button to stretch out the timeline display.
Chapter breaks can be removed. Click to the right of the marker for the chapter break you want to remove. Then click the Clear button on the main Tool Bar, press the Delete key, or choose Edit > Clear.
Note: DVD-Video does not support adding chapters to Stills, Slide Shows or Still Shows. Also, some DVD players may have trouble playing tracks with greater than 72 chapters defined, although the DVD specification allows for up to 99.
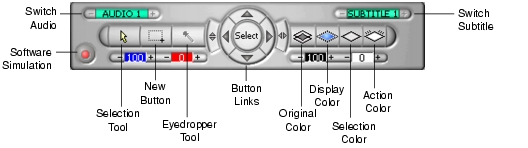
Visually, a menu is made up of a background image and a subpicture overlay that are composited to create the menu image seen by the viewer. A menu also includes a button highlight stream containing both the hotspot definitions and the commands for on-screen buttons (see Button Highlight Stream).
After the background image and corresponding subpicture have been imported into a menu Track, the button hotspots (up to 36 for 4:3 Standard, 18 for 16:9 Widescreen) and commands are defined in the Preview window.
To create a button hotspot, start with the Track selected and the Preview window in Design mode (see Design Mode). Click the Create Button tool on the Preview window tool bar, which sets the cursor to New Button mode. Click and drag in the Preview window display to define the rectangle of the new button hotspot. The hotspot area you define will normally correspond to graphical elements in the background image or the subpicture overlays.
Note that buttons are numbered by ReelDVD in the order they are created. The first hotspot you define should be for the button that you want selected by default when the viewer arrives at the menu.
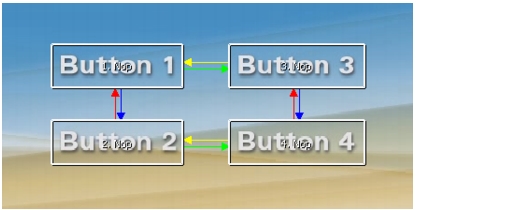
Paths between buttons define the order in which button selection moves around the menu in response to the Up, Down, Left and Right keys on the remote. To define these paths, choose the link type (Up, Down, Left or Right) from the button link tools in the center of the Preview window’s tool bar. Then click within the hotspot of one button and drag to the hotspot of the destination button. See Button Link Tools for more information on button paths.
In DVD’s subpicture system, each of the four colors in a subpicture image file is used as a mask to define a complex region of the screen, much like a video color key mask. The actual color that appears in each of these four areas during playback, as well as the contrast value (opacity) of each color, defaults to values set in the Highlight colors tab of the Project Settings dialog (see Color Tab). The same is true for the colors and contrast used within button hotspots when a button is selected and when it is activated.
The default color and contrast values can be modified for any given menu using controls in the Preview window as follows:
Note that areas of the subpicture that are not within any button hotspot will not be affected by the settings in the Selection or Action modes.
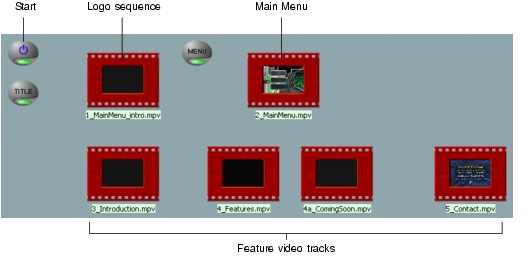
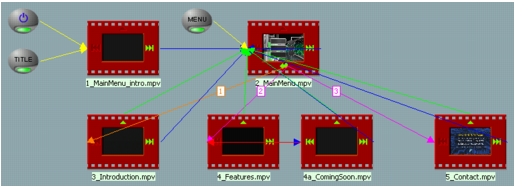
The core of DVD authoring is defining the flow of the program. This includes designating special Title and Menu Tracks and defining the playback order of content (motion video, Still Show, and Slide Show Tracks) and menus.
Much of the work of defining program flow is done in the Storyboard area. Before you begin, it’s recommended that you organize the Tracks in a way that corresponds visually with your intended program flow as defined in the project plan.
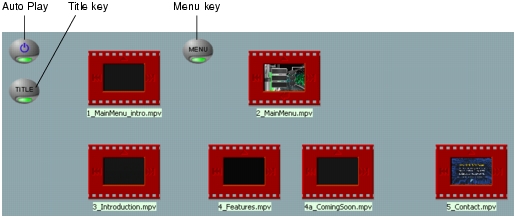
ReelDVD’s Storyboard area contains three special icons (Auto Play, Title, and Menu), each of which is used to define Tracks that have a special function in the program flow (see also Auto Play, Title, and Menu Icons).
A DVD title can include a series of video segments that are intended to go from one to the next without any action by the viewer, or to go from the end of a video segment directly to a menu. This flow is achieved by adding Next Track links to the Track icons that represent the DVD’s video content in the Storyboard area. In addition, Previous, Next, and Return Track links are used to define the project’s behavior when the viewer presses various keys on the remote control (see also Track Icons):
Note: Deleting a Track will clear all links to and from that Track.
Another aspect of defining the flow of the program is to define button commands. A button command can link from the current Track to another Track (magenta Link Arrow) or to a chapter within a Track (orange Link Arrow). Until its command is defined, a button is referred to as having No Operation (“Nop”).
When one or more buttons are created in a Track (see Creating Menu Buttons), the Command (CMD) Track link indicator appears at the bottom of the Track icon.
Note: Deleting a Track will clear all links to and from that Track.
|
Sonic Solutions/ Voice: 415.893.8000 Fax: 415.893.8008 info@sonic.com |